Copyright ksmt.com panorama---English Top---English BBS---Japanese Top
###########################################
##### QTVR Tutorial on Windows by ksmt.com #####
###########################################
Last update : January 17 2005 by ksmt.com
PTGui version 5.6 enhancements section 4.11 added. I recommend you to use the latest PTGui 5.6. New "Project
Assistant" is probably usefull in most cases if you use normal (rectiliniar)
lenses. If you use Fisheye lens, you should probably use "Advanced"
button as you did before.
update: August 3 2005 by ksmt.com
How to create a QuickTime VR on Windows ? Should I buy an Apple computer
? - No, you can do it on WIndows in an easy and inexpensive way.
1. Install software
1.1 Install PanoramaTools
1.2 Install PTGui
1.3 Install Photoshop
1.4 Install PanoCube
2. Buy a camera and lens
2.1 Digital SLR
2.2 Nikon FC-E8/FC-E9
3. Take pictures
3.1 Nodal point and Panorama head
3.2 Using a tripod
3.3 Using a monopod
3.4 Handheld
3.5 How many pictures to cover 360 ?
3.6 Camera parameter
4. Stitch by PTGui and PanoramaTools
4.11 PTGui 5.0 enhancements
5. Retouch by Photoshop
6. Convert to QTVR
7. Embed QTVR in your HTML
8. Trouble shooting
9. Congraturations! - Welcome to QTVR world.
10. QTVR gallery
Appendix: Sample images and PTGui project file
Copyright ksmt.com panorama---English Top---English BBS---Japanese Top
1. Install software
1.1 Install PanoramaTools (Free software)
- Download PanoramaTools Windows version 2.6b1 from http://www.path.unimelb.edu.au/~dersch/
- Download the latest pano12.dll 2.7.0.10 from http://www.photocreations.ca/panotools/
- Move the file pano12.dll into the directory C:\Windows\System\
1.2 Install PTGui (30 days free trial - $60 to buy - very low price)
- Download and install PTGui from http://www.ptgui.com/
- I recommend you to use the latest version 5.6 - see section 4.11 for PTGui 5.6
1.3 Install Photoshop
- Photoshop Elements is good enough. I'm using Photoship Elements 2.0 bundled
in Canon EOS 10D.
1.4 Install PanoCube (Free software)
- Doenload and install PanoCube from http://www.panoshow.com/panocube.htm
- Be sure no white space in your folder path of your PanoCube executable.
I recommend you to use C:\pc
- Be sure no white space in your folder path of your source images. I recommend
you to use C:\pc
- If you need advance features, buy PanoCube plus (Only $13)
2. Buy a camera and lens
2.1 Digital SLR + Sigma 8mm Circular Fisheye
- To generate high quality QTVR from 4, 5, 6 or 7 images, Sigma 8mm produces
good result
- Detailed work flow explained in this tutorial
2.2 Compact Digital Camera + Nikon FC-E8/FC-E9 fisheye converter
- To get reasonable quality QTVR from 3 images using light weight and inexpensive
camera system, this is good.
- This is a traditional way and many people are using this today.
2.3 Digital SLR + any lens
- To genearte very high quality QTVR with more than 20 images, this combination
is ideal. But, it's difficult.
- Try by yourseld. PanoramaTools is very flexible. I haven't tried yet.
3. Take pictures
3.1 Nodal point and Panorama head
- You should take all pictures from a point of view. You should rotate
camera around a point called "nodal point".
- In circular fisheye lens case, the nordal point is the tip of the lens.
- To rotate camera around the nodal point, make your own panorama head
or buy a panorama head.
- If you want to make your own panorama head, please refer my examples.

Very cheap one uning bookend. About $2.
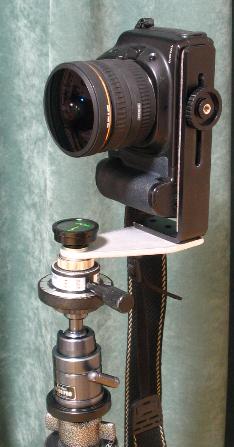
Better one. About $30.

For Nikon E990 + FC-E8. E990 is designed for QTVR. Very simple head is
good enough. About $2.
- If you want to buy a panorama head from market:
http://www.kaidan.com/index.shtml
http://www.stereoscopy.com/jasper/panorama.html
http://www.agnos.com/
http://www.manfrotto.com/
http://gregwired.com/pano/Pano.htm
3.2 Using a tripod
- I recommend you to start QTVR using tripod and panorama head. It will
make your stitching easy.
3.3 Using a monopod
- After you get used to, you can try a monopod. It's handy and give you
more freedom.
3.4 Handheld
- Expert mode. You can make a very unique QTVR. If you understand the nodal
point well, it's not difficult.
- Stitching would be difficult.
3.5 How many pictures to cover 360 ?
- When you use Full size SLR (1DsMarkII) and Sigma8mm, minimum 3
- When you use APS-C SLR and Sigma8mm, minimum 4
- When you use compact digital camera and Nikon FC-E8/E9, minimum 3
- In this tutorial, I used 7 images, 5 horizontal (portrait), 1 top and
1 bottom.
3.6 Camera parameter
- Manual white balance: Typically use daylight: for same color for all
images
- Manual apature and shutter speed: for same brightness for all images
- Manual focus. Sometimes auto fucus is usefull, though.
- I use the lowest contrast setting, but it's your choice.
4. Stitch by PTGui and PanoramaTools
This is 7 image example. If you use fewer images, it should be much easier.
4.1 Invoke PTGui and Drag&Drop 7 source images to PTGui
4.2 Lens Setting
- Lens Type: Circular
- Hor Field of View: 180 degree
- Leave all other parameters as default
4.3 Panorama Settings
- Projection: Equirectangular (for special panorama)
- Field of View: 360 (hor.) x 180 (vert.) degrees
- Leave all other parameters as default
4.4 Crop
- Align white circle and border of the image using mouse. Use "Apply
to all images" button.
4.5 Image Parameters
- Select one "Anchor image" which include horizontal object
*1 For portrait images, rotate either -90 or 90 degree as Roll. Adjust
the horizon of the "Anchor image"
*2 Specify -180 Yaw to an image. This makes you easy to retouch images
using Photoshop.
*3 Specify Pitch 0 for horizontal images. Adjust horizon of the "Anchor
image". Pitch 90 for top image. Pitch -90 for bottom image.
| No |
Yaw |
Pitch |
Roll |
comment |
| 0 |
-180(*2) |
0(*3) |
-90/90(*1) |
horizontal |
| 1 |
-108 |
0 |
-90/90(*1) |
horizontal |
| 2 |
-36 |
0 |
-90/90(*1) |
horizontal |
| 3 |
36 |
0 |
-90/90(*1) |
horizontal |
| 4 |
108 |
0 |
-90/90(*1) |
horizontal |
| 5 |
0 |
90 |
-90/90(*1) |
top image |
| 6 |
0 |
-90 |
-90/90(*1) |
bottom image |
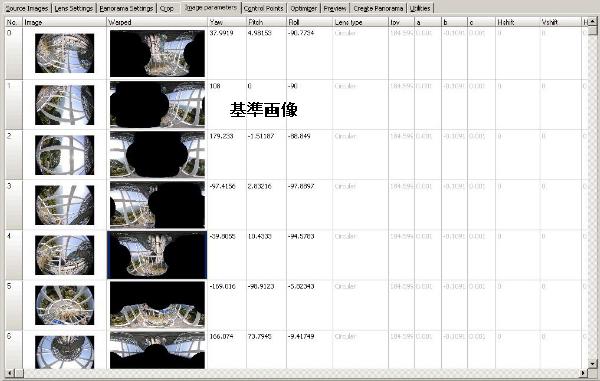
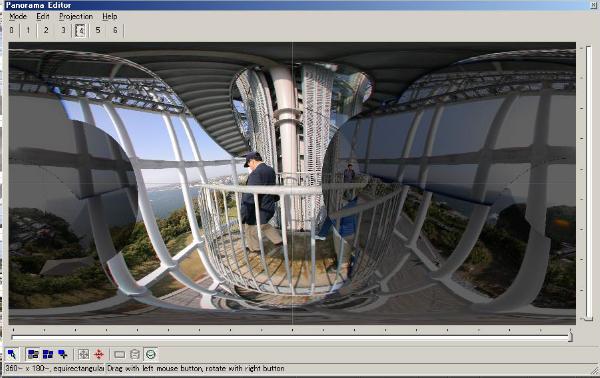
You can use "Panorama Editor" to view the result.
4.6 Control Points. 0-1: between image 0 and image 1
0-1, 1-2, 2-3, 3-4, 4-0 Set control points between horizontal adjacent
images. 3 points per image pair should be good.
5-0, 5-1, 5-2, 5-3, 5-4 Set control points between top and horizontal images.
2 points per image pair should be good.
6-0, 6-1, 6-2, 6-3, 6-4 Set control points between bottom and horizontal
images. 2 points per image pair should be good.
4.7 Optimizer
- Anchor image: Specify an Ancho image. Parameter of the Ancho image will
stay same.
- Optimize lens Field of View: Off
- Run Optimizer
4.8 Preview
- I recommend you to use "Panorama Editor" rather than Preview
because it's slow.
- If you use Preview, Width 800, Height 400 should be big enough
4.9 Create Panorama
- File Format: Photoshop without feather (.psd)
- Width: 4000 (6000 for full screen)
- Height: 2000 (3000 for full screen)
- Output file: sample.psd
- Leave all other parameter as default
- Create Panorama!
4.10 File->Save to save all paramaters
4.11 PTGui 5.6 Enhancements (http://www.ptgui.com/download.html)
I strongly recommend you to use the latest PTGui 5.6. It's much improved
from 4.x. To stitch images without any moving objects such as walking human,
please try "Project Asistant" first. It's automatic. To stitch
images, try "Advanced". You can do it as you did before.
4.11.1 Project Assistant
- Project Assistant is a enhanced 3 step GUI. It's very good if no moving
object are included in your images. Syatem will add all control points
automatically.
- Project Assistant is a easy-to-use 3 step stitching
1.Select source images
- You can rotate images by clicking arrow buttons at the right top corner.
- By default, tutorial images are selected.
2. Generate control points
- PTGui 5.0 or later analyzes all images and set all neccesary control
points. You don't have to set those by yourself.
- If many moving objects are included in your source images, such as a
walking human, this may not create good result. Use "Advanced"
button for those images. You still can do in the way as you did on PTGui
4.x.
- Panorama Editor will be invoked after stitching is done. Use "123"
button for Numerical Transform, you can change Yaw, Pitch and Roll interactively.
3. Create Panorama
- File Format: You can choose 4 formats, JPEG, TIFF, Photoshop, Photoshop
large
- Layers: You can choose 3 ways
--Blended panorama only - good for well aligned panoramas, such as using
tripod for perfect nodal point
--Indicisual layers only - good for badly aligned panoramas, such as handheld.
You can edit by Photoshop as you did before. I always use this.
--Blended and layers - both blended and layers are written into Photoshop.
Good for so-so aligned panoramas.
4.11.2 Panorama Editor enhancements
- Panorama Editor is interactive stitching tool now. Speed is much improved.
Use "123" button for Numerical Transform, you can change Yaw,
Pitch and Roll interactively. You don't have to use Image Parameter tab.
4.11.3 PTGui Optimizer
- You can choose Optimizer, PTGui or Panorama Tools. PTGui Optimizer generates
good result quickly.
4.11.4 Create Panorama
- File Format: You can choose 4 formats, JPEG, TIFF, Photoshop, Photoshop
large
- Layers: You can choose 3 ways
--Blended panorama only - good for well aligned panoramas, such as using
tripod for perfect nodal point
--Indicisual layers only - good for badly aligned panoramas, such as handheld.
You can edit by Photoshop as you did before. I always use this.
--Blended and layers - both blended and layers are written into Photoshop.
Good for so-so aligned panoramas.
5. Retouch by Photoshop
- Open sample.psd file generated from PTGui
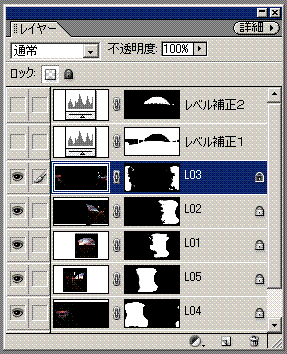
- Select a mask layer
- Delete or draw mask layers to adjust the edge between layers.
- Make sure the left edge and right edge should be aligned correctly, especially
when you edit the top and bottom images.
- Output a high quality JPEG file, sample.jpg
6. Convert to QTVR
- Drag&Drop sample.jpg onto the PanoCube icon
- Set QTVR paramaters by editing Script.txt. You can set the following
paramaters.
75 # This is JPEG quality.
360 # Viewer window width.
240 # Viewer window
height.
0 # Initial pan angle.
0 # Initial tilt angle.
70 # Initial
field of view.
-180 # Min pan angle. Default is -180.
180 # Max pan angle.
Default is 180.
-90 # Min pitch angle. Default is -90.
90 # Max pitch
angle. Default is 90.
10 # Max zoom in.
120 # Max zoom out.
1 #
Generate html.
- If it didn't work, make sure no white space or any special characters
used in your folder path of PanoCube binary and your source images.
7. Embed QTVR in your HTML
- Dirfect and simple reference of the .mov file
<A href="sample.mov">
- Full screen (This is good only on IE. For Netscape or other browsers,
use Javascript.)
<A href="#" onclick='window.open("sample.htm", "new",
"fullscreen=yes"); return false'><IMG src="thmbnail.jpg"></A>
<EMBED src="sample.mov" autohref="true" scale="tofit" width="98%" height="93%" pan="60" fov="70" tilt="-10" controller="true">
8. Trouble shooting
I saw or heard the following problems multiple times. Those are very common
trouble.
8.1 Cannot specify 180 degree as vertical FOV ? - You should use a good pano12.dll. Version 2.7.0.10 recommended.
8.2 Cannot run PanoCube ? - make sure no white space or any special characters
used in your folder path of PanoCube binary and your source images.
8.3 Sigma8mm aperture broken ? - The apature of Sigma8mm is very small
and sometimes the apature doesn't return to the open opsition. If you use
Canon camera, set F32 and push the preview button or release the shutter
several times. They the apature would return to the open opsition.
8.4 Optimizer return "bad" - Review your control points first.
If you cannot find any problems, try to adjust parameters by hand using
"Panorama Editor". If this doesn't give you a good result, your
source image are something wrong. Go ahead on Photoshop to repair as much
as you can. When you took pictures handheld, don't worry. "bad"
is pretty good.
8.5 Very hard to retouch using Photoshop, especially people are moving
across images ? - You can use "Photoshop without feather (.psd)"
as output file format from PTGui. By derasing/drawing quick mask layer,
it's easy.
9. Congraturations! - Welcome to QTVR world.
Produce better images and ask people to link your web site.
10. QTVR gallery
Enjoy famous QTVR gallery on web and learn how to make better images.
http://www.panoramas.dk/
http://geoimages.berkeley.edu/wwp.html
http://www.ksmt.com/panorama_e.htm
Appendix: Sample images and PTGui project file for Windows
Please use the following sample flies if you don't have source images yet.
This is 6 images case, 5 horizontal + 1 top, no bottom image.
A1. Download the following flies to a folder, using "save target as".
A2. Double click ic4.pts. PTGui will be up. PTGui will complain that "The
following image could not be found". "Do you want to locate it
in a different directory ?". Please push "Yes", then specify
the right folder in which you downloaded the sample images.
Source image 1
Source image 2
Source image 3
Source image 4
Source image 5
Source image 6
Sampele PTGui project file(ic4.pts)
http://www.ksmt.com/panorama/050727shinagawa/ic4.mov(My result as rfeference)
Copyright ksmt.com panorama---English Top---English BBS---Japanese Top