For CubicVR Creator
*** Nordal Point: Acceptable Error and Creative Strategy ***
Japanese version
Rikuichi Kishimoto http://www.ksmt.com 
2008.10.31 First Edition, Japanese language only
2009.1.31 Translated into English by R.Kishimoto
2009.9.22 "6. Adjust size..." added by R.Kishimoto
INDEX: Nordal Point: Acceptable Error and Creative Strategy
0. Introduction
1. Basics 1.1 Strait line? 1.2 Close-up? 1.3 Retouch after stitch?
2. XYZ Axis
3. Error Example
4. Tricks
5. Aggressive use of error
6. Adjust the size of object by moving nodal point intentionally
0. Introduction
All panorama creators care the "Nordal Point"very much. "Nordal
Point" is a point which panorama photographers turn a camera around.
In most cases, we try to fix the nordal point for all pictures to be stitched.
A tripod or a monopod with special rotators are often used to fix the nordal
point. However, some certain amount of errors of nordal point are not avoidable.
The error is acceptable if it's reasonably small. I found some realistic
number of the acceptable errors after a few years I started taking panorama
pictures using cameras hand-held. In some cases, you can even use the
errors intentianally to create unique panorama pictures no one have done
before.
1. Basics
Basically, we should fix the nordal point as much as we can. But, it's
actually impossible to avoid very small error such as one micron. The acceptable
error could be 1 micron, 1mm, 1cm, 1m or even 50m depending on what kind
of picture you are taking. If you are officially taking panorama pictures
in a small room of historical building about to collapse, the error should
be less than 1mm. If you are taking a snapshot panorama pictures on a street,
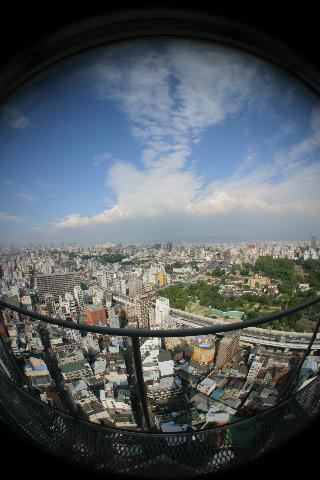
the error would be 10cm. If it's from a very high tower such as Tokyo Tower,
50m error would be just fine. From my experience, the acceptable error
of nordal point should very much depend on the following factors.
1.1 Straight line exist ?
Human have very good eyes to find stitching errors on a straight line.
If a straight line on a wall or ceiling in a room was curved after panorama
stitching, everyone would think it's not acceptable. But, if a curved branch
of a natural tree was bended to a different direction after stitch, everyone
think it acceptable. No one can recognize the error because no one but
you knows the real curve of the branch. This indicate the acceptable error
of nordal point very much depend on whether any artificial straight lines
exist in the panorama picture.
1.2 Close-up or infinite ?
Acceptable error of nordal point varies upon distance between camera and
the object. If it's close, the acceptable error should be small. If it's
far, the acceptable error should be large. For example, when you shoot
an object 10cm(100mm) from your camera, the acceptable error would be 1mm.
If you shoot landscape 100m away, the acceptable error would be 1m. Whan
I shoot from an observatory of Tokyo tower which is 150m high from the
ground, 50m erres was just fine during stitching.
1.3 Retouch after stitch ?
The error of nordal point will make your panorama stitching difficult.
If you don't like retouch after stitching, the acceptable error of nordal
point should be much smaller. If you can accept heavy retouch, yon can
accept big error of nordal point. Let me describe some more detail.
1.3.1 Cheat on nordal errors
You can retouch to cheat on errors where pictures are not really match
on a border because of nordal errors. Some people don't accept this becuase
it's a fake. Some like me can accept this because panorama picture is essentially
a synthesized fake. If you decieded to retouch after stitch, the nordal
error could be bigger. This is a preference of panorama creator.
1.3.2 Handling moving object
If a fast moving object exist across a border of two pictures you are stitching,
you have some technique to handle this. You can create a layered Photoshop
data from PTGui or some other stitching tools which you can choose one
better moving object by removing another moving object in another layer.
You can also remove all moving object by using very slow shutter speed
such as 10 second.
1.3.3 Cheat by adding extra fake object
If you cannot cheat using the technique described in 1.3.1, you can add
extra fake object to hide the error. If you have a building with bending
straight lines after stitching, you can add a upper layer with a walker
you took some other time or place to hide the error. Most of walkers on
street are attractive too see and you can improve your panorama images
by adding this. Do you think it's a fake, a lie, an good effect, a collage
or a nature of panorama stitching ?
2. XYZ Axis
We don't have any rule or restriction how we handle X/Y/Z axis in 360 Cubic
VR. When an astronaut shooting panorama at a place very far from the earth
can choose Z axis whichever he likes. Latest panorama stitching software
such as PTGui doesn't have any restriction in choosing X/Y/Z axis. You
can rotate your equirectanglar panorama pictures to any different angle
during stitching. So, you don't have to worry about rotating your camera
horizontally during shooting. You can rotate camera around any axis or
even no axis should be just fine while you cover all 360 degree around
the nordal point. This indicates there is no absolute X/Y/Z axis in CubicVR
Panorama itself.
However, there are some significant difference in importance among X, Y
and Z direction in nordal point. This would be because human being stand
vitrically on ground for a long time(just a joke). But, this is very true
if you us the technique I descrived in 1.3.3 section. You can actually
add anything afterwards such as a walker, a car, a bike, a cat or a pig,
to hide your stitching errors. Let me call this technique as "Wappen".
If don't use Wappen, please just fix your nordal point as much as you can
and please forget this section.
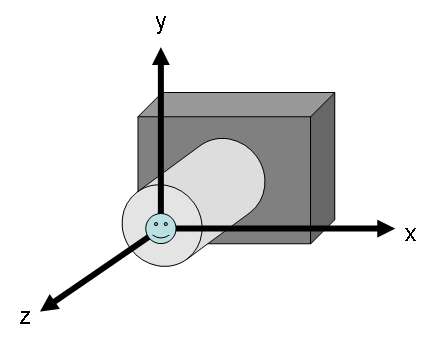
If you use Wappen, Y axis which is actually a hight of camera from ground,
is very important than other directions. For a picture of Wappen, you can
ignore X direction at all. You should care Z direction a little bit, but
not so important in most cases. To fix Y axis, you just set you camera
from a certain hight from ground such as eye level or knee level.
Z axis is distance between camera and an object. If you are closer to an
object, the object would be projected bigger in picture. If you are far
from the object, it will be projected smaller. Closer object will hide
other objects. This is similar to the layer system of Photoshop. If the
object is far enough from camera, you can just shrink or enlarge the object
linearly in Photoshop to adjust Z axis. When I added a Wappen using 300mm telephoto lens on top of a panorama picture taken by 8mm fisheye
lens, I didn't see any problem because the object was far enough. If you take a close-up picture using fisheye lens, you should take care of Z axis to some certain degree.
When you use Wappen, you don't have to think about X axis at all. You can
choose any porizontal position when you shoot pictures. If you prefer natural pictures, you should think
about lighting of the object. If you want clear pictures rather than a
natural pictures, you can use a stroboscope.
Wappen is a fake, but it can halp you make more attractive images. If you
took a panorama of a old and historical well without anyone enjoy washing
clothes, you can ask your mamma and your grandma to be a Wappen after you
got back home. Add your mam and grandma to the panorama would make your
panorama attractive. This is a matter whether you actually take your mam
and grandma to the well, or you take them to the well virtually inside
Photoshop.
3. Error Example
Some example or acceptable error of nordal point would help you understand
better. This is just from my experience. I use handheld and I don't use
any tripod or monopod in most cases. So, the number would much bigger if
you are using a tripod. I think there are two types of panorama photographers
today.
Type 1: Take panorama photography only within a cirtain nordal error criteria.
If he set it as 1cm, he won't take any panorama pictures from where the
error bigger than 1cm.
Type 2: Take panorama photography anywhere even if the nordal error was
100m. He has technique to make attractive panorama image from the bad source
with huge nordal errors.
I know most of panorama photographer are Type 1. I was also Type 1 for
around two years after I started panorama. I hope the following number
can help some panorama photographers who are slowly moving to Type 2.
### Acceptable nordal point error distance, example by experience of ksmt.com
panorama ###
1mm - Close-up panorama 10cm from lens
1cm - Accurate panorama in a small room
1cm - City with tall building with all straight lines
5cm - General outdoor panorama without retouch after stitch.
5cm - General indoor panorama
20cm - General outdoor panorama with retouch after stitch
50cm - Pole panorama using long and swinging pole
50cm - Outdoor without any artificial straight lines
50cm - Indoor at night, such as a party, with retouch
50cm - Outdoor at night with bright lights
1m - Outdoor at night, dark
20m - From top of a building at night
50m - From tall bulding or tower
I can find some common factors from those examples.
3.1 Acceptable nordal error is in propotion to the distance from camera
to the object. 1mm for 10cm close-up panorama, 100m for 10km landscape
panorama.
3.2 Top and bottom, two cubic faces are the issue. If you have very flat
black sky at top face or flat white table at bottom face, your retouch
would be much easier.
3.3 If you use layer in Photoshop or if you use Wappen during retouch,
acceptable nordal error would be bigger.
4. Tricks
Long ago, when Sir Isasc Newton investigated optical lens, he thought no
one can remove aberration as long as dispersion exist on glass. However,
achromatic lens was manufactured later using the dispersion. Concave lens
with high dispersion is obviously effective.
Similaly, if we cannot avoid some errors in Nordal point, we shoudl be
able to think about how we can use the error to create attractive panorama
images.
Example using nordal error - "Extended Nordal Point":
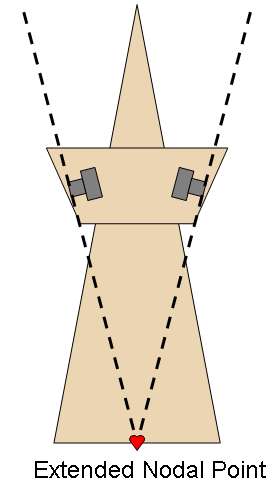
Tokyo Tower has an observatory 150m high from ground. The windows of the observatory lean forward for people to look down Tokyo
city. You can take pictures for all eight directions to cover 360 degree
except very top. The first time I did this, I was surprised I could stitch
360 CubicVR even with 50m error of the nordal point. I named this as "Extended
Nordal Point". The extended line from the camera meet at a point on
the ground. This would be the reason I could stitch bottom cubic face even
with 50m nordal error.
I tried to make a CubicVR of the observatory level. But after stitching
done, an image from far above the tower. I guess the view point was extended
up to the sky and nordal point was extended to a point on the ground. This
may not be true because whether look down or look up may not affect to
the panorama image and nordal point at all. Probably 50m is just a acceptable
or ignorable error if you take pictures from 150m high.
Stitching night scenery is much easier because the darkness hide almost
all problems. This could be one of the most important thing you should
aware.
You can use the same technique for a building or tower with wellhole.
5. Aggressive use of error
Thinking nordal error as an acceptable or ignorable thing is a negative
way of thinking which I don't like. We can use the nordal error aggressively
to create creative panoramas.
If yor are taking a panorama picture in a beautiful scenery. But there
was a telegraph pole in front of you which you cannot remove if you shoot
from a fixed nordal point. If you shoot two different pictures from slightly
different position, you can remove the pole. This is a intentional nordal
error you can introduce.
I used this technique only once. At Tsutenkaku tower in Osaka (please scroll down), I removed all rails outside of the window by using PTGui generated layered
Photoshop data.
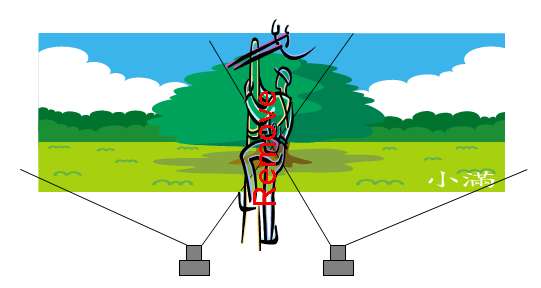
6. Adjust the size of object by moving nodal point intentionally
You can adjust the size of an object by lowering the nodal point. You can
create a huge monster from a small monkey by lowering your camera only
a few feet. I used this technique in a 360 panorama "Harajuku Street
Art" for World Wide Panorama 909 "Performing Arts". I't's
pretty easy.
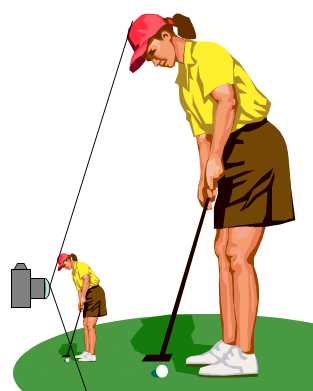
Left: noraml golfer, five feet tall and 100lb. Left: giant golfer, 15 feet,
2700lb. The hight of the camera is around the belt for the normal golfer
and arund the leg for the giant golfer.
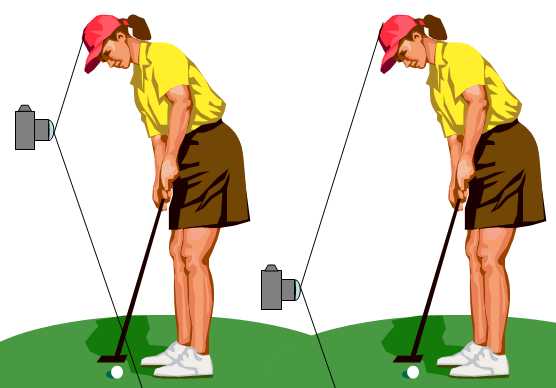
By moving down your camera only a few feet, you can create a giant golfer
with 3 times taller than the normal golfer. You can add the giant golfer
in your panorama pretty easily during stitching panorama. For her, 300
yards can be easily covered using putter.
Thank you. If you have any questions and suggestions please send an email
to